A brilliant article which I would link easily uncommented times:
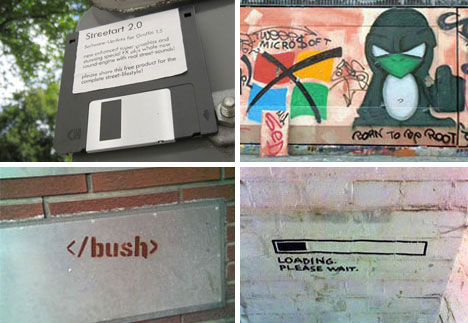
42 Works of Geek, Temporary & Reverse Graffiti
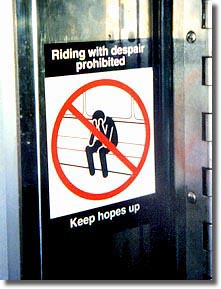 And to this project by a human which "True" is the name. The idea is as simple as brilliant: just replace those pesky instruction signs in the subways Duch others. Notice at first glance anyway, and no one looks forward to the second and finds it funny.
 nice that they have chosen to read this tutorial on creating a tube.
To to build tube, they must delete the first dice start . They do best when they select the cube dan and X button press. Confirm the following dialogue. Have they created a scene and saved, they can open a new by going to File-New
way 1: Press the
space bar or click on header (the top bar) to Add . Now please choose from Mesh . And then Circle . Click OK . It would have to change in the edit mode (Tab) , the circle now be yellow . Change to the front view (Num 1) and click the E key . Please select from the upcoming pop-up Only Edges . zooming them with the mouse wheel little further from the scene. Tighten the new Verticle up, they do this best with the Restricted movement (Z-key) . Are you satisfied with the length of its tube? Yes, then click they now left. Press Tab to move into the object mode. To this tube to straighten they choose in Modiefiers Panel in the Editing Buttons Add Modifier and select from the menu Subsurf . a tube is best even so, because, if you can Set Smooth in the clicked tab Mash , errors. Click on the menu levels 3 .

Route 2:
they start a new scene with CTRL-X. Do not forget to save the PRIOR. Delete the start dice. Add it with Add-Space-Curve-Bezier Curve a curve. Go with Tab in edit mode. The curve should now be highlighted. Deform them pull through (G key) and / or rotate (R key) curve out in a desired Form (Note: Extrude works here again).

Change to object mode (Tab). Add a Bezier  with space bar add-Curve-Bezier Circle added. Reduce it by pressing the S button and move the mouse to the center of the circle. When it reaches the areas equipped with size, they move it out of sight of the camera (G key). Rename them both fields in the Link and Materials Panel With A (This is easier to remember). Now click again on their turn. In Curve and Surface Search button they please in the right column BevOb field:, where they now bear the name of the Bezier circle, ie A is a. Si Confirm with Enter. You see, that the curve in the 3D window was framed sofo with the circle. Now change the size (S-key) of the circle, they see the thickness of the tube changes. Furthermore, if as in this picture ugly creases, edit their curve shrink again in edit mode (Tab), or the circle (S-key).
Are you satisfied? Then they turn but their tube (which is still a curve) in a mesh (you can apply all the available options for a mesh). This make them the easiest way to bring the cursor into the 3D window and press ALT + C. (The curve must be selected). Confirm the demand. Now their tube has edged, go they Subsurf the Modifiers Panel and choose Add Midifier. Select 2nd Level And klciken then click Set Smooth. Now their tube is ready. With a customized material and mist they could look like this:


they select the cube Start by clicking in just . He should now be framed magenta. Press the Tab key or click on the edit mode editing window. Now, the cube would translucent, yellow frame and the magenta areas are . In the bottom bar now quite have appeared many new buttons . Press in the Mesh Tools the Subdivide key or the mouse in 3D window the W key (Special Menu) and potential to select the first field Subdivide. Well, the cube is divided into more areas. rotate them quiet a bit by pressing the scroll wheel or press with activated Num Lock key the 2,4,6 or 8 button . You see, the die has now each face multiple surfaces get on each crossing points are seen. Just click once on a point (right mouse button) and pull this off, or they can also use the G key instead of drawing. You see, the corner of the cube is moved and deformed. Now they please in the schlalten top view (Topview) by the press button 7 on the number pad . You can also reach over View 
Now they can start texturing.


Go to the Link and Materials Panel (in the context Shading submenu Meterial Buttons ) under the name material in the field, is by 2 Mat 2 . Now click on the arrow to the left and select in such 2 Mat 1 . Though this be the case, they need to do anything else. Now go press F6 into the texture to get buttons . There, click on one of the 10 fields and select Add new . Once done, the field appears to the right Texture Type . Click this on and off the following window choose image. appear now they have 2 more riders Just click on load and select the previously saved image (this it is necessary to know the location). Do they still have no picture, I offer them this (not so beautiful) image. Once done, they switch back to the Material Buttons. Now scroll the mouse wheel, so that they can recognize the Texture tab. Now click on input map. There, the field should be enabled Orco.
 They also have to include clear the field for Flat and Cube menu. Once done you can press F12. Is the texture of them, too dark, they can change this by setting the slider under Ref Shaders to 1000. You can also the Camera move (G key) and rotate (R key) for better results to the end result should look bekommen.Jetzt (more or less beautiful) as follows:

Now they have their work only store, they do this by clicking File-Save As . Now, select the location and rename the file. Once done, they can each save operation with the keyboard shortcut CTRL- abbreviate W or File-Save .
Congratulations! You have completed this tutorial and learned how to create simple meshes and textured this. I hope you have fun for me and they want to continue to work with Blender, animate perhaps later a hit movie or create a nice little game. Read more tutorials to deepen in this program or simply experimenting around with the software.

Blender has a very komlpiziert looking interface, it has one jeodch erlenrt only once, you want to use any more. In the beginning, you can dice a (Cube) a circle with a point is to recognize a lamp (Lamp) and the Camera (Camera) . In the cube, the axes of a coordinate system s be seen. Under the 3D window a bar can be seen in the many buttons are available.

the top of the bar belongs to the 3-D window verchiedene and offers navigation and some editing options. Below you can see 6 different panels , click on one that leads to another context menu that displays additional settings. If you hold the mouse one second a panel erschient, a small help text. The panel and settings:
first The Logic button controls the game settings and options of a physics mesh (body). beginners do not need it really.
second The Script button controls the Phyton (Programiersparche) scripts, even this is not needed for beginners.
third The material button controls the colors and textures that is placed on a body. Without these options, a body seems gray and lifeless . In Preview window displays a preview which buttons to show them on various bodies such as ball, dice, hair, or monkey . In window material can be processed color, plus you click either the white box next to it, or move displayed controller. The Shader part indicates the strength of reflection and their hardness options, the Mirror Transp . Part of the mirror and glass options . In part texture, the variety of options for a specified texture using Map input and Map to specify options . Moreover, at the top appeared four new buttons : The Lamp Button (for the settings of a lamp), the Anktivierte material button that (to edit textures to load and their options) texture button , the Radiosity - and World Button (To edit the background settings).
4th The Button object divided in the Object Buttons Pannel (for the Object Edit), the buttons Cloth (For a body to soften, such as liquid ) And the particle Buttons (To add a body hair or a emitter (controller) to control or double .
The fifth most Start Editing button activated by the be machined to a body, and the material settings can be controlled.
6th The S cene Button in which the Render size who can location and other various options of the image are changed. To appear 4 new buttons : Activated Render button , the Sequencer button (for movies), the Anim-/Playback button and the button Sound Block (Brand New Excellent for the sounds).
all the time on a small field with a is displayed, the display of the currently  activated frames (single image) . It is used for key frame animation .
In the small box on the left , the window type be changed. 
These fields specify the edit mode, a Mesh deform the Edit  mode needed. The next field is the Draw Type on, they may, switch to different views , depending on what is needed.
The other buttons are not for beginners , or  needed later explained . If they keep the mouse on the top bar, is the mouse pointer shift characters , they can now the bar enlarge or in which they make a right click and Split Area choose to divide the window. With Join Areas a window is deleted.
Blender is a free open source 3D animation software, originallly by "NeoGeo" published. In May 1998, retired " NeoGeo" out of business, it was the time when Ton Roosendaal the father and principal founder Blenders decided that the company "Not a number" of reasons to Blender further. Thus, the software in a product, which however was in the business world very unusual, because the free Verion funktioneal was full and the license can also be a commercial use and production to. Unfortunately, the business goals were too high and the company was founded in April NaN went bankrupt. Blender threatened in the abyss to disappear. To save the program, founded Tom Roosendaal the "Blender Foundation" . On 18th July 2002 initiated fundraising events and on 7 September 2002 was ready enough money at the 13th October 2002 Blender under the GNU (General Public License) to be published. With Blender then there was a development that is unparalleled in the 3D animation software of their peers. At last, a film was produced, the first feature film, released with an Open Source project was. The film, E lephant Dream put on some records, among other things, he is the first HD-DVD film Europe.
Blender you can download here.
I make no claim to the correctness of my content, the logo in the header I have from the Blender site (blender.org ) copies, if members of the Blender production do not agree, I would like them to contact me . All other content were created by myself. If they find something offensive on this blog, I want them to sit down as soon as possible with me. The information in this post All information is based on the contents of the preface is what Blender Blender Book by Carsten Wartman. If you would erschwünschen more tutorials and further reading, a visit to the page Blender book worth
@ daniel.reinhardt go4more.de